If You’ve Gotta Have the Bubbles…

With 2017 having just begun, a number of us are reflecting on how this year will really be the best yet.  In general, I don’t do New Year’s resolutions, but I appreciate that many people like a date to mark the beginning of significant life change.  That date provides motivation and it has a personal meaning.  (Although it wasn’t planned, I even remember the date that I decided to pursue plant-based living over FIVE years ago, which I’ll be writing about next week.  Stay tuned!)

I published my first post to this blog on New Year’s Day 2015, so I truly understand the symbolism of a new year’s seemingly clean slate.  Although raising my two little ones has had more of an impact than I would like on how often I’m able to publish new posts, I’m keeping at it in my own time.  THANK YOU for sticking with me!  🙂

As 2016 dwindled down, I had a lot of people reaching out to me for guidance in diving into a plant-based diet or just eating more healthily in general.  Today’s post is inspired by one such inquiry. We are making over the beloved bubbly beverage soda!

Several months ago, a Facebook friend of mine was looking for a smarter alternative to soda, the one unhealthy item she just couldn’t seem to kick.  She isn’t the first person I’ve chatted with that can’t get enough of the bubbles; when she was getting married, my sister Petra—a longtime Coke lover—registered for a soda stream just to carbonate water in an effort to drink less cola.  I’ve also witnessed a number of friends throughout the years make the switch to diet sodas to hold on to the carbonation without the calories.

I’ve never been in to soda myself, but I definitely see the draw.  It isn’t so much the flavor or the sugar; it’s the bubbles.  They are tingly and refreshing and a welcome alternative to flat beverages like coffee, tea, and water.  I totally get it.  I can’t bear, however, watching people I care about continue to consume high fructose corn syrup, artificial flavors and dyes, and manmade sweeteners when I know that there is a better way to get that bubbly fix.

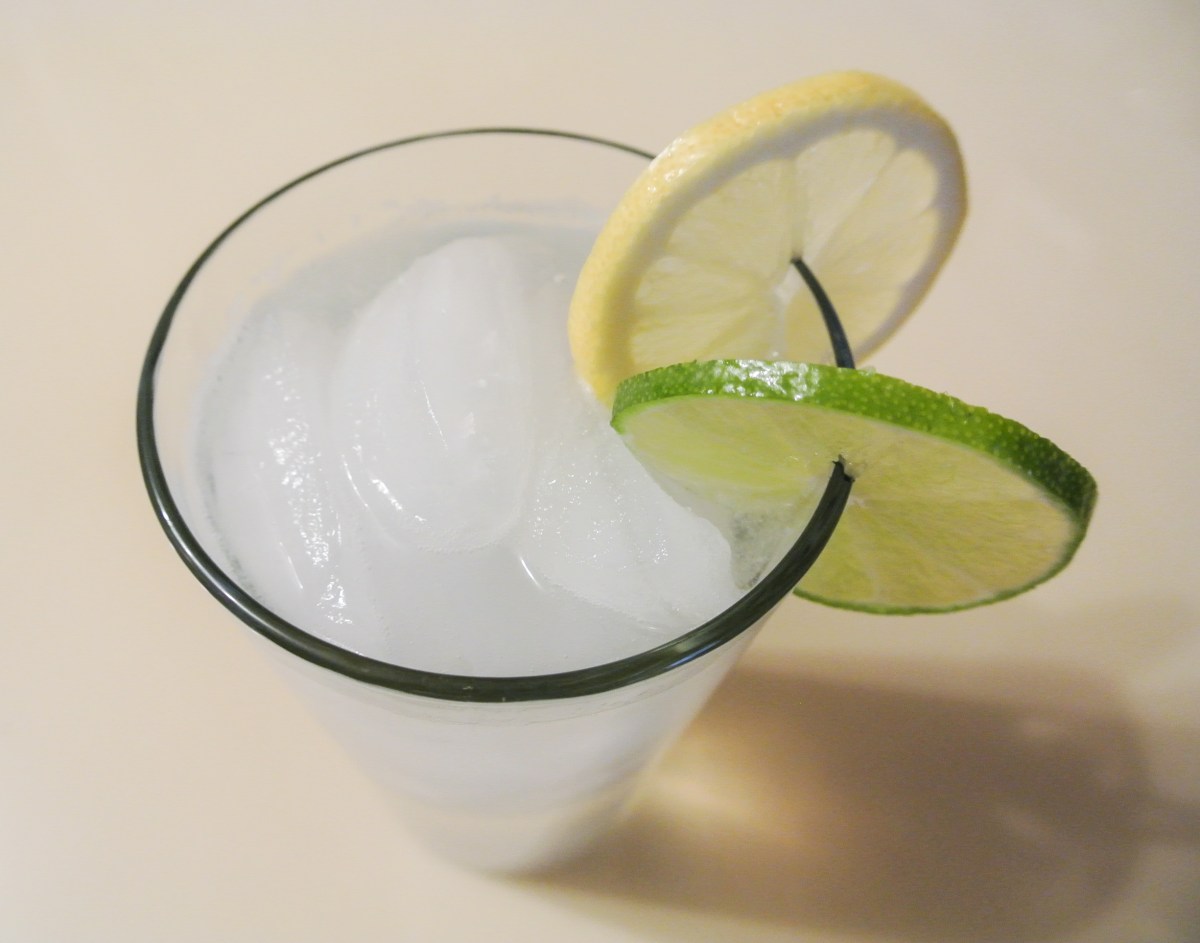
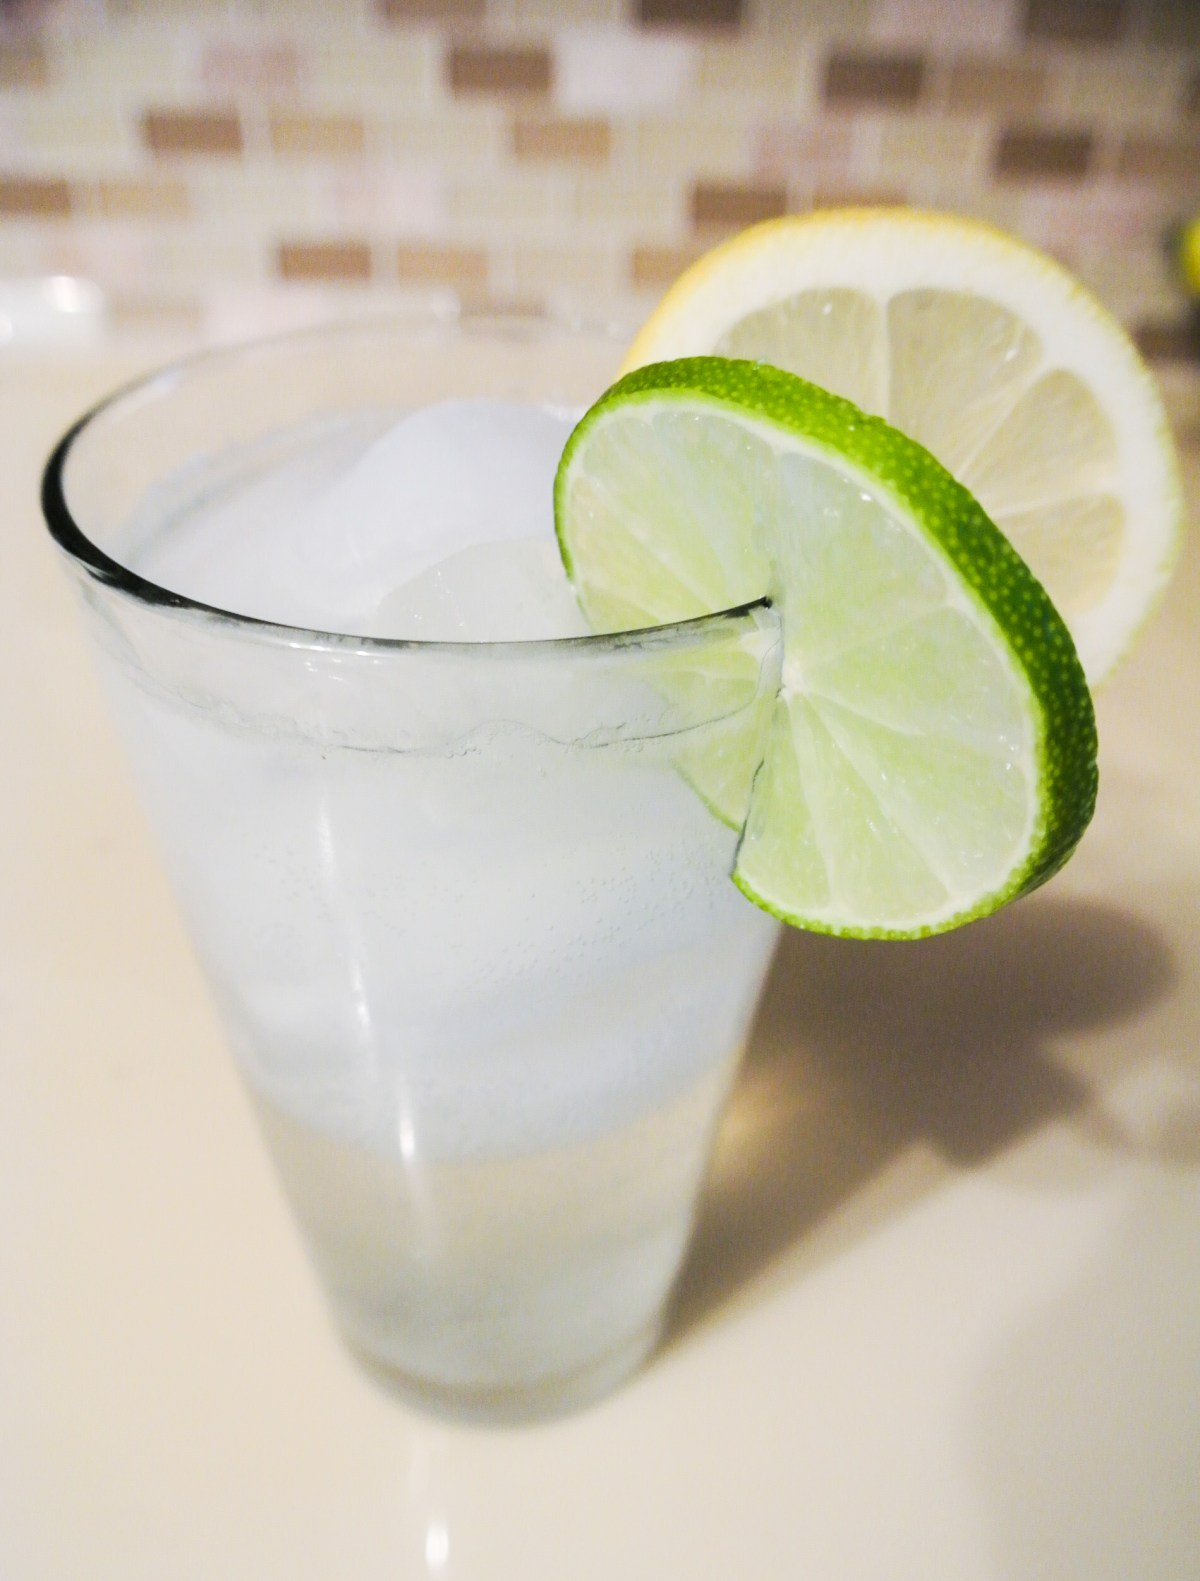
When I did consume soda (or pop, as we call it in Michigan) growing up, it was almost always Sprite.  The lemon-lime flavor is light and crisp and seems a perfect match for the bubbles.  So today, I’m making my own version of Sprite.

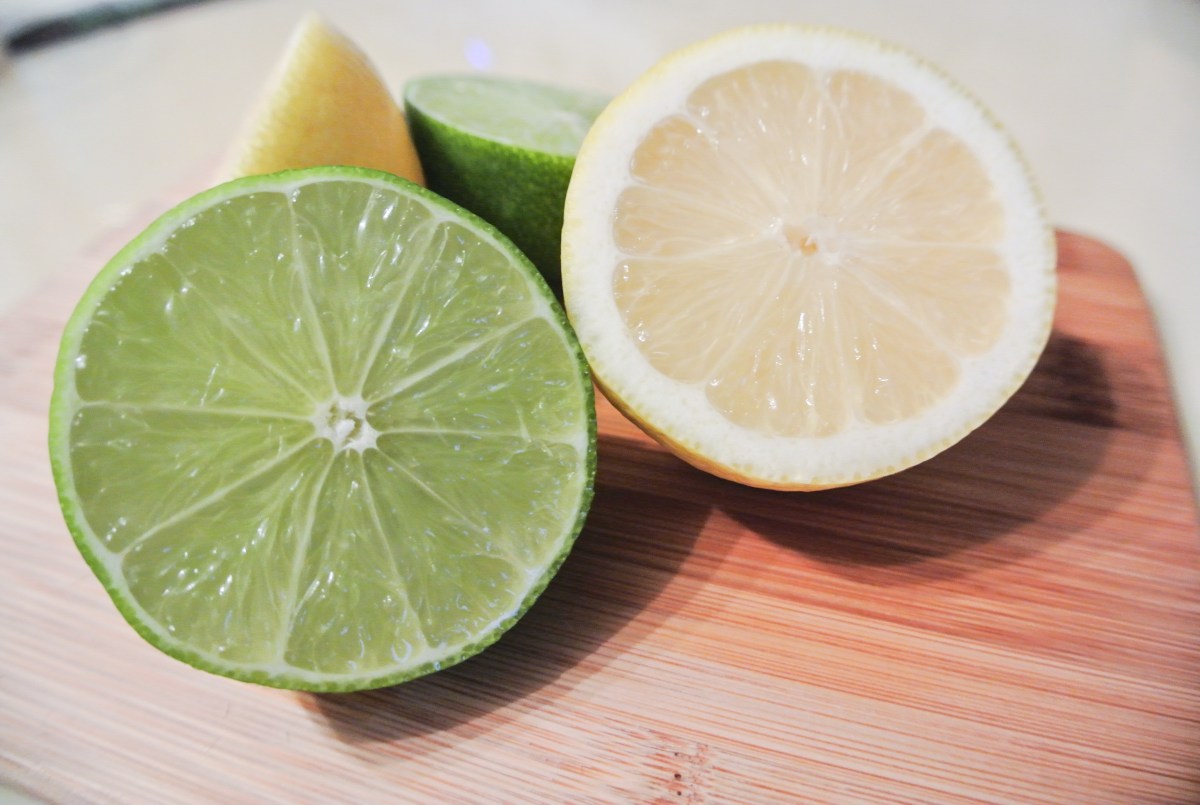
For starters, I’m using juice from a real lemon and a real lime.  As a result, my soda will be a bit cloudier than commercially produced versions, but I’m alright with that in the name of health.  Although highly dependent on the size of the fruit, the juice from one lemon contains roughly 15-20 calories and 50% of your daily recommended vitamin C and the juice from one lime contains roughly 10-15 calories and 30% of your daily recommended vitamin C.  Adding a couple of teaspoons of this freshly squeezed citrus juice to my soda is adding a negligible amount of calories and a noteworthy amount of vitamin C.  Yes!

soda-i

Secondly, I’m using an all-natural, plant-derived sweetener that is lower in calories than cane sugar.  You know that I don’t count calories (when you eat as healthily as I do, you certainly don’t have to), but knowing the facts is important when you’re trying to lose weight or tone up, so that’s why I’m sharing this information with you.  Xylitol is a sugar alcohol naturally occurring in the fibers of certain fruits and vegetables such as strawberries and cauliflower.  It contains 10 calories per teaspoon and does not have a significant impact on blood sugar levels.  So, we score again!  (If blood sugar, diabetes, or other issues related to sweeteners is of concern regarding your health and diet, make sure to do your own research on this or any product, of course!)

8 ounces of my lemon-lime soda contains roughly 30-35 calories and no artificial flavors or dyes.  8 ounces of Sprite contains 96 calories and the following ingredients: carbonated water, high fructose corn syrup, citric acid, natural flavors, sodium citrate, and sodium benzoate.  (Check it out on Coca Cola’s website if you need to see for yourself!)  I don’t know about you, but I like the idea of club soda, fresh juice, and xylitol better.

Have a soda stream?  Carbonate your own water and save yourself the sodium often found in club soda.  You could also get through the soda preparation more quickly by simply mixing your sweetener and water and dropping in one of my water infusers, which you’d already have on hand in your freezer.  Sweet!

And one final note, after many trials and tastes tests, I developed a soda formula that hits just enough of the sweet spot for me.  If you’re coming off of a serious soda addiction, you may need to start with a tad more xylitol until your taste buds adjust. 🙂 Enjoy!

FORMULA BASE:  SODA

  • 8 ounces carbonated water –> I’m using club soda.
  • 3 teaspoons freshly squeezed fruit juice –> I’m using 1.5 tsps lemon and 1.5 tsps lime.
  • 2.5 teaspoons natural, plant-derived sweetener –> I’m using xylitol.
  • OPTIONAL: pure extracts, spices, or herbs* to taste –> I’m not using any today.

*Can you imagine how delicious a sprig of fresh mint would be?!  Yum!

Combine all ingredients and stir until sweetener is dissolved.

Pour over ice.  If you make extra, be sure to stir before serving and keep in mind that like any soda, it may become flatter over time.

soda-v

Advertisement

Never Cook Oatmeal Again!

Oatmeal is one of my favorite breakfasts (I say “breakfast,” but typically don’t eat anything until about brunch/lunch time), but I often find that the moment I realize I want it, I don’t have any pre-prepared.  I then have to cook it right then and there and it is scalding hot afterward for what seems like an hour.  I don’t want to wait that long when I’m hungry.  🙂

I’ve recently gotten into the overnight oats trend.  There are a number of vegan bloggers that I’ve seen prepare oatmeal this way, which involves no cooking whatsoever.  The oats are soaked overnight and ready to eat the next morning!  In addition, if you’re trying to eat more raw plants—which are higher in nutrients and lower in calories—this take on classic comfort breakfasts is for you.

Now, if when you take your oats out of the fridge the next morning you don’t want to eat them cold, you’ll need to dish some up and leave them on the counter to get to room temp for a bit or pop them in the microwave.  Inevitably, they will cook a little if you opt for warmer oats, but you can control the heat level and cooking time of the microwave to minimize the loss of nutrients.  I have read in several places recently that microwaving food is the cooking method that removes the least amount of nutrients from food that enters in a raw state.  I’m still skeptical, but the research is certainly interesting…

Anywho, if you’ve played around with my traditional oatmeal formula, you’ll find that really the only difference is that you’re soaking the oats overnight rather than simmering them on the stovetop.  In addition, you can do this with steel cut oats, but you’d need a lot more liquid and probably time, too, so I stick with rolled.

This is a delicious, nutritious, and filling breakfast for you as well as a great ready-to-go breakfast for littles before school in the morning.  🙂  Enjoy!

FORMULA BASE:  OATMEAL

Serves 6-8

  • 4 cups uncooked rolled oats
  • ½ cup specialty ingredients + extra for garnishing (finely chopped raw fruit, dried fruit, raw nuts, raw seeds, etc.) –> I’m using ¼ cup each hemp and ground flax seeds.
  • 1/8-1/4 cup sweetener –>  I’m using just over 1/8 cup pure maple syrup.
  • ½-1 tsp extract (amount will depend on flavor intensity) –>  I’m using 1 tsp vanilla.
  • 1 tsp spices –>  I’m using 1 tsp ground cinnamon.
  • Liquid of choice for soaking (water or unsweetened plant milk) –>  I’m using unsweetened Ripple milk.*

*I’m typically a die hard almond milk fan, but I am trying to minimize nut exposure for my one-year-old for a little longer, so I’ve recently tried this brand.  Ripple milk is made from yellow peas and doesn’t taste much different than almond.  I found it at the Super Target by my house.

plant-milk

Place your oats in a large glass bowl with a lid.  Stir in all ingredients and fill the bowl with liquid enough to cover the mixture by about half an inch.

oatmeal-ingredientsovernight-oats

Cover and place the bowl in the fridge overnight.  In the morning, stir to combine any remaining liquid that may have settled on the top.  Store leftovers in the fridge for up to a week.

Fudgy Brownie Bites

I’ve heard about people making brownies with black beans (I plan to try it out at some point), so that was the inspiration behind today’s truffle concoction.  I’ve recently become all about using beans in “desserts,” thus my cookie dough truffles made with white beans.  These brownie bites use my cookie dough truffle formula with a chocolatey twist!

Before I made the truffles with black beans, I really liked them and was pretty blown away by how much they taste like traditional cookie dough.  Now that I’ve subbed the black beans—which are high in protein, fiber, folic acid, and magnesium, and a solid source of potassium and iron—and tossed in some cocoa powder, I LOVE these truffles!  It’s kind of freaky how much they ended up tasting like ooey gooey fudgy brownies.

A true chocolate addict?  Up the cocoa powder, double the chocolate chips, or dip in melted dark chocolate.  Enjoy!

FORMULA BASE:  COOKIE DOUGH TRUFFLES

Yields 16-20 balls

  • 1 ½ cups cooked beans (e.g. garbanzo, great northern, cannellini, etc.) –> I’m using black.
  • ½ cup seed or nut butter (nuts/seeds ONLY) –>  I’m using peanut.
  • 1/8 cup+ liquid sweetener (e.g. agave syrup, maple syrup, etc.) –> I’m using ¼ cup agave.
  • ½-1 tsp extract (amount depends on flavor intensity) –> I’m using 1 tsp vanilla.
  • Pinch of pink Himalayan sea salt (optional) –>  I’m not using it.
  • ½ cup chips (e.g. chocolate, dried fruit, chopped nuts, etc.) –> I’m using 2 1/2 tbsps unsweetened cocoa powder and 1/4 cup mini-semi-sweet chocolate chips (vegan).

Combine all ingredients—except the chips—in a food processor and run until smooth. Transfer dough into a bowl and stir in chips.

dsc_3010

Using a melon baller or teaspoon, form into balls and roll in your hands until smooth. Ready to eat immediately! 🙂 Store leftovers in the fridge.

dsc_3014


Baby’s Banana Muffins

I have many readers that have shared with me that my super food muffins are among the first solids (after purees, of course) that they try with their babies.  (I’m flattered, amazing readers! <3)  I imagine this is because in addition to being loaded with super foods, they are easy to tear into small pieces and turn into mush in the mouth similarly to bread.  I typically make the muffins with a little bit of texture—shredded veggies or nuts, for example—but for all of the babies out there that might just be getting used to solids, I whipped up a batch that contains mashed banana as the star.

Don’t get me wrong, these are delicious and nutritious for anyone, and you could always throw in some chopped walnuts if you’re looking for a bit more texture yourself.  I’ve also played around with this formula and made some adjustments to reflect more experimentation in the kitchen.  If you have my original formula memorized like I do, you’ll notice the tweaks below.  🙂

A final note…

Ingredients like nuts, depending on whom you talk to, are not necessarily recommended for little ones.  I’ve read no nuts until age two.  I’ve also read eighteen months, and I’ve read that it might not even matter at all.  If you’re concerned about your baby consuming nuts, seeds, or plant milks made from such ingredients, always ask your child’s pediatrician first.  Then, enjoy!

FORMULA BASE:  SUPER FOOD MUFFINS

Makes 12 regular sized muffins

  • 1 cup flour –> I’m using whole wheat.
  • 1 cup cooked small grains (e.g. quinoa, kaniwa, millet, etc.) –>  I’m using millet.
  • 1/2 cup uncooked rolled oats
  • 2 tsp baking powder
  • 1 tsp baking soda
  • ¼ cup sweetener –>  I’m using light agave syrup.
  • 1/8 cup oil –>  I’m using coconut.
  • 1 cup raw (fresh or frozen) fruit or veggie –>  I’m using mashed banana.
  • 1-1 ¼ cups plant milk –>  I’m using almond.
  • 3 tbsps seeds (e.g. chia, hemp, poppy, flax, etc.) –>  I’m 1 tbsp each chia, hulled hemp, and ground flax.
  • ½-1 tsp extract (amount will depend on flavor intensity) –>  I’m using 1 tsp homemade vanilla.
  • ½-1 tsp spices –>  I’m using ½ tsp ground cinnamon.
  • ½ tsp salt (optional) –>  I’m not using any.

Preheat your oven to 350 degrees. Separately combine all of the dry ingredients and all of the wet ingredients (include the mashed banana in the wet).

muffin batter

Pour the wet into the dry and mix with a wooden spoon. The batter will be thick and lumpy, but you can always add more plant milk if it seems too dry or dough-like. Spoon the batter into a lined or greased cupcake pan and bake for 20-25 minutes. Use the toothpick test! Store in the fridge for up to two weeks.

Versatile Vegetable Marinade

Although the cellular structure of many fruits and vegetables is more difficult to penetrate than that of meat, it is still possible to marinate produce.  As with marinating meat, typically, the longer the better so that the produce can absorb as much flavor as possible. My marinade formula could certainly be used for meat, but of course, I prefer it on virtually any vegetable and some fruits.

In American cooking, marinating usually leads to grilling (or roasting), and today’s asparagus dish is no exception!  While I prefer to eat the majority of my produce raw, there are some items that are simply unpalatable in a raw state.  For me, asparagus is one of those, in most preparations.  I have had thin shavings of raw asparagus atop a salad before, but there’s quite a bit of work that goes into such a preparation and with the two littles always eat my feet, there isn’t always the time.  🙂

Thus, I’m using asparagus as the vehicle for my pre-grilling vegetable marinade.  When prepared al dente, asparagus—which comes in green, white and purple—is just delightful.  Too mushy and too raw = no bueno.  This fibrous vegetable is high in vitamin K and most notably, folic acid, which may ring a bell if you’ve ever taken prenatal vitamins.  Asparagus is a true super food!

asparagus

Hands down the best part of this marinade is that it need not be tossed once your veggies hit the grill.  Marinating meat leaves you with contaminated leftovers; marinating veggies leaves you with a delicious salad dressing.  Waste not, want not.

Lastly, while I use this marinade primarily on vegetables, you could also soak hearty fruits like pineapple to add a little sweetness to your kabobs.   Enjoy!

FORMULA BASE:  VEGETABLE MARINADE

Yields 1 cup marinade

  • 2 pounds raw vegetables (or fruit) –>  I’m using green asparagus.
  • ½ cup acid (i.e. freshly squeezed citrus juice, vinegar, mustard, etc.) –>  I’m using the juice of three lemons and one heaping tablespoon of whole grain mustard.
  • ¼ cup oil* –>  I’m using extra virgin olive.
  • ¼ cup liquid sweetener (i.e. agave syrup, maple syrup, etc.) –>  I’m using pure maple syrup.
  • ¼ fresh herbs** –>  I’m using rosemary.
  • Salt, pepper, spices, and/or dried herbs to taste –>  I’m using several grinds of black pepper and ½ tsp each garlic powder, onion powder, and pink Himalayan sea salt.

*When it comes to heating, not all oils are created equal.  Ideally, when grilling (or sautéing, frying, or roasting), you want to use an oil with a higher smoke point.  This allows you to optimally maintain nutrients and flavor when the oil is subjected to heat.  In addition, it is safer to cook with oils that contain primarily monounsaturated fats, although occasionally cooking with those primarily composed of polyunsaturated won’t hurt.  Today is one of those days for me as olive oil is not preferred for grilling, but it has the deeper flavor that I want.  Nine times out of ten, I use refined coconut or avocado oil.

**If you don’t plan to save excess marinade, it doesn’t really matter how finely your herbs are chopped.  (The bulk of my rosemary fell away in the grilling process and any excess leaves in the leftover marinade were easy to pick out.  Rosemary, in my opinion, does not have an enjoyable texture, even when finely chopped.)  If you do want to save the excess, however, finely chop your herbs so that you’ve got a more texturally appealing salad dressing when all is said and done.

Prepare your vegetables (peel, chop, etc.) and line them up in a 9 x 13 baking dish.  You can toss them right in or skewer them.

Mix together all marinade ingredients, starting with the wet.  I like to layer the ingredients in a single measuring up so that I don’t have to dirty multiple measuring cups.

pyrex

Pour the marinade over your veggies and let them soak for several hours, turning occasionally.  Once your vegetables are on the grill, drain any excess marinade and save in the fridge for salads.

cooked

Puppy Chow Remix

Today’s sweet treat is a cross between the classic American snack, puppy chow, and one of many special cookies that my mom makes every year for Christmas.  The happy marriage happened quite by accident.

When my dad was in town, he went over to my aunt’s for her famous chop suey, which she always tops with crunchy chow mein noodles.  Always the hostess with the mostest, she sent my dad back to my house with ample leftovers, including a huge bag of the chow mein noodles.

Now, while chow mein noodles aren’t particularly nutrient rich, this brand is vegan and not horribly unhealthy either.  Not one to waste food, I put my thinking cap on to transform them into a quick and easy snack, rich enough that one or two at a time will do you just fine.

chow mein noodles

My mom’s Christmas haystack cookies are named as such because they include chow mein noodles bathed in peanut butter and melted butterscotch chips, resulting in a small heap that looks just like the perfect home for a needle.  My intention was to replicate these—one of my favorite holiday treats she makes—the Fresh Formula way:  vegan.

There may be vegan butterscotch chips out there, but regardless, I didn’t have any on hand.  Just a couple of days before inheriting the chow mein noodles, I stocked up on some 85% dark chocolate in bulk.  I never tasted it when I bought it; the bitter smell alone told me that this chocolate was meant for melting and repurposing.  Thus, the idea for dark chocolate haystacks—or as Nolan calls them, “spiders”—was born.

dark chocolate

You can substitute any nut butter and any meltable chocolate to make this recipe your own.  You can also substitute any cereal—Chex is used in traditional puppy chow—crackers, pretzels, nuts, or chips for the chow mein noodles if you aren’t set on your heaps looking like hay.  As long as the combination tastes fantastic, the shape and appearance of the clusters doesn’t much matter.

The reason these treats ended up a cross between the haystacks and the puppy chow was because the 85% dark chocolate was much bitterer than I anticipated.  I enjoy 70% dark chocolate regularly and thought that 15% wasn’t substantially higher…but no, it is!  Even though, according to the ingredients listed on the bulk bin, there is sugar in the chocolate, I could barely taste it and practically puckered when I bit into the first haystack.  Travis thought of puppy chow and suggested I toss the haystacks around in powdered sugar to compensate for the lack of sweetness.  It worked enough for me—I’m so used to dark chocolate now that I don’t need my desserts oozing with sweetness—but Nolan said he would like “new spiders” with a little more sugar.  🙂  Lesson learned for next time.

Other tips…

This is the type of formula where having a kitchen scale really comes in handy.  I am getting better and better at eyeballing amounts and weights, but being precise is generally preferred in any recipe.  Using a simple kitchen scale, you can easily measure out the ingredients for today’s haystacks.

scale

Secondly, a roll around in powdered sugar is optional and I wouldn’t have done it had I not selected such a bitter chocolate that I made the mistake of not tasting first.  Oops!  If you like your desserts extra sweet, by all means, make it snow!  Just make sure to make your own powdered sugar (I use turbinado); remember, white, refined sugars are typically white as a result of bone char from cows.  Not vegan.  🙂

powdered sugar

You could also toss your haystacks in or top them with chopped nuts, sprinkles, or any other garnish that would add to the appearance or flavor.

You’ll love these yummy treats!  Assuming your little ones aren’t irked by spiders, they are bound to dig in, too!

FORMULA BASE:  HAYSTACKS

Yields 24 haystacks

  • 7 ounces unsweetened/minimally sweetened crunch (i.e. cereal, crackers, chips, pretzels, nuts, etc.) –>  I’m using chow mein noodles.
  • 12 ounces vegan chocolate (chips or bars) –>  I’m using 85% dark chocolate bars.
  • ¾ cup nut or seed butter (nuts/seeds only) –>  I’m using a combination of peanut and sunflower.
  • ¼ cup garnish (i.e. powdered sugar, sprinkles, chopped nuts/seeds, desiccated coconut, etc.) (OPTIONAL) –> I’m using homemade powdered sugar.

Using a double burner*, melt your chocolate and nut/seed butter together over medium high heat, stirring occasionally.

double burner

Once melted, pour the mixture over your crunch element and stir to combine.  If the combination seems too runny, you can always add more crunch.

mix

Use a spoon to dollop small heaps of the mixture onto baking sheets lined with silicone baking pads or parchment paper.  They will eventually solidify if left on the counter top, but the process is expedited in the fridge or freezer.

haystacks

Once solid, you can top your haystacks with or toss them in a garnish, if you wish.  Store in an airtight container at room temperature.

up close

*Don’t forget to protect yourself from steam that might escape your double burner.  I wear gloves start to finish in the process of melting chocolate and don’t remove them until I’ve poured the chocolate out of the melting vessel. 🙂

2-to-1 Copycat Larabars

Let me start by saying that I think Larabars are absolutely fantastic.  I love the company’s transparency with ingredients and even better, I love how simple the ingredients are.  The truth of the matter is, to buy quick and easy snacks made with natural, whole foods and no preservatives is NOT cheap.  So, true to my Fresh Formula concept, I make my own.

Don’t get me wrong – it’s still somewhat expensive to make Larabars at home, but you save in not paying for packaging and you can tailor the formula to what is on sale in bulk (which is how I purchase all of my nuts and seeds for trail mix and more).  More importantly, you can customize the ingredients to perfect an already pretty darn delicious model.  Of course, I’ve created an easily adaptable formula that works with both nuts and seeds, if you’re concerned about any allergies.

In today’s rendition, I’m using a variety of raw nuts and pepitas.  The pepita is the kernel of the pumpkin seed, which you can see below.  If you checked out my original power bar recipe, you know that pepitas are a powerhouse of nutrition.  I put them in recipes like today’s and throw them atop salads, too.

pepitas

As far as the dried fruit in my Larabar formula is concerned, you’re going to get your easiest process with medjool dates.  When they are fresh, they are soft, creamy, and easy to blend.  Other dried fruits will do just fine, but you may need more of them to achieve the same effect as the dates.

My son (well, my whole family really!) LOVES these.  I pack them in his lunch for school and you can cut them into any shapes you want for your littles.  No added sugar, salt, or oil = delicious and nutritious.  Enjoy!

FORMULA BASE:  COPYCAT LARABAR

Makes 16-18 bars

  • 2 cups unsweetened dried fruit –>  I’m using pitted medjool dates.
  • 1 cup raw nuts and/or seeds –>  I’m using a mix of walnuts, pecans, almonds, cashews, brazil nuts, hazelnuts, and pepitas.

Blend all ingredients in a food processor until a thick, pliable dough forms.

dough

Press into an 8 x 8 pan lined with wax paper.  Flatten with your hands.  Cover the dough with an additional piece of wax paper and smooth out the dough (it need not be perfect).

pan

Let chill in the fridge for a couple of hours before cutting.  Store in the fridge for a firmer consistency.

This slideshow requires JavaScript.

Potato Salad with Fennel, Lemon, and Dill

This square meal is a game-changer!  When I first developed my potato salad formula, I knew it was good, but it wasn’t until I whipped up today’s version that I really fell in love.  Something about the combination of raw fennel, lemon, and dill just says summer.

That taste/feeling of summer is fresh, with bright, light flavors.  In a dish like potato salad that is dense and creamy, this balance is so important, especially when you’re lugging a heavy bowl of the stuff to a hot backyard barbecue.  In addition, if you’ve tried making my potato salad before, you know that unlike its mayo-based distant relatives, mine won’t get all funky after sitting in an outdoor buffet for a couple hours.  Woo!

What’s more, when it comes to my food, the approval of my family and friends means a lot.  I don’t need it per se, but it certainly reaffirms why I take the time try new recipes and write about what I’m eating:  I really have an opportunity to educate others about healthy eating…and share with the world that despite what you may have heard, vegan food is ABSOLUTELY delicious and satisfying.

I write all of this because my brother-in-law, who may as well have started fan club for mayo lovers, put his stamp of approval on today’s recipe.  This is HUGE!

The star in today’s potato salad is fresh fennel.  I love to eat the bulb—the most commonly consumed part of fennel—in a number of ways, but this recipe utilizes only the stalks and fronds (you could use the bulb instead/as well).  I keep it simple with thin slices and mix right in.  Fennel—which looks like a standard vegetable but is actually an herb—is loaded with fiber and potassium, but is notable primarily for its digestive benefits.  Fennel can relieve bloating and gas, as well as stimulate appetite and digestion.  I once visited a vegan restaurant where fennel seeds were served after our meal for this very purpose.

fennel

The last item I want to mention is that I don’t use processed, mock mayonnaise products to substitute for the real deal (I also don’t used processed “cheeses” and “meats” either); I find plant-based whole foods that can be transformed without preservatives, chemical additives, or excess salt to satisfy the craving for animal-based counterparts.  This requires more time in the kitchen, but it is often less expensive, and more importantly, I like to know what I’m eating.  🙂

You.  Will.  Love.  This.  Recipe.  Enjoy!

FORMULA BASE: POTATO SALAD

Serves 4-6

  • 2 pounds potatoes –> I’m using russets.
  • 2 cups diced raw vegetables –> I’m using the stalks and fronds of one medium-sized bulb of fennel and approximately ¼ cup of sliced green onion.
  • A double batch of my creamy salad dressing (see below)
  • ¼ cup crunch (raw seeds, nuts, etc.) (optional) –> I’m not using any since the raw fennel is quite crunch itself.

For the dressing (NOTE: Formula already doubled below.):

  • ½ cup seed or nut butter –> I’m using cashew cream (soak raw cashews overnight and blend with just enough water to form a thick cream).
  • 5 tbsps acid (citrus juice, vinegar, mustard, or a combination) –> I’m 1 ½ tbsps of whole grain mustard, plus the zest and juice of 1 lemon.
  • Thinning liquid as needed (ideas:homemade veggie stock, water, or more acid) –> I’m not using any.
  • Up to 4 tbsps raw garlic and/or fresh/dried herbs and/or spices (optional) –> I’m using ½ tsp garlic powder, ½ tsp onion powder, and 1 tsp dried dill.
  • 1-2 tsps sweetener (optional) –> I’m not using any.
  • Pink Himalayan sea salt and pepper to taste –> I’m using ½ tsp salt and several turns of freshly ground black pepper.

Thoroughly wash your potatoes so that you can keep the skin on. Chop into bite size pieces and steam, boil, or roast (I’m roasting). While your potatoes are cooking, make your dressing. Cover and place in the fridge for the flavors to come together.

When your potatoes are done cooking, drain (if necessary) and place in a glass bowl to chill in the fridge, at least to room temperature. While the potatoes are cooling, chop your veggies and crunch element, if using.  After the potatoes have cooled sufficiently, pour your dressing on top and stir gently to combine. Enjoy for several days (if you have any leftovers!).

potato salad

Cookie Dough Truffles, Take Two

It’s been a while since my three-year-old ate beans other than in tofu. It’s also been a while since I whipped up a batch of my cookie dough truffles. Thankfully, I can solve both problems with one delicious and nutritious treat!

The first time I made these truffles, I used peanut butter and garbanzo beans as the base. This time, I’m using sunflower butter (which has also made appearances in my power balls and bars) and great northern beans. Like many beans, great northerns are jam-packed with fiber, protein, iron, and folate. Beans are a true super food and incredibly versatile. They’d have to be if I’m using them in dessert, right?!

DSC_2907

Please excuse the mushed appearance of these beans, which came from a can. Remember, always try to buy dry beans and soak and sprout/cook them yourself. I am working on finding a system that works for me, but for whatever reason, I have a terrible time digesting beans that I’ve prepared. They are the only item I buy canned, ideally organic and/or with no salt added whenever possible.

Anywho, today’s PSA aside, we are ready to roll, literally! These truffles make for an easy snack for humans big and small…

…or, dip them in melted dark chocolate, let harden, and bring to a party. I love seeing the look on people’s faces when they can’t get enough of my food and then I tell them it’s vegan. Since when is vegan food supposed to be repulsive?! 🙂 Enjoy!

FORMULA BASE: COOKIE DOUGH TRUFFLES

Yields 16-20 balls

  • 1 ½ cups cooked or sprouted white beans (e.g. garbanzo, great northern, cannellini, etc.) –> I’m using great northern.
  • ½ cup seed or nut butter (nuts/seeds ONLY) –> I’m using sunflower.
  • 1/8 cup+ liquid sweetener (e.g. agave syrup, maple syrup, etc.) –> I’m using pure maple syrup.
  • ½-1 tsp extract (amount depends on flavor intensity) –> I’m using homemade vanilla.
  • Pinch of pink Himalayan sea salt (optional) –> I’m opting out.
  • ½ cup chips (e.g. chocolate, dried fruit, chopped nuts, etc.) –> I’m using a heaping ¼ cup of mini-semi-sweet chocolate chips (vegan). This time around, my dough was a tad too sticky to roll, so I also added ¼ cup ground flaxseed and unsweetened desiccated coconut (I keep both on hand in my pantry at all times).

Combine all ingredients—except the chips—in a food processor and run until smooth.

DSC_2909

Transfer dough into a bowl and stir in chips. Using a melon baller or teaspoon, form into balls and roll in your hands until smooth.Ready to eat immediately! Store leftovers in the fridge.


Back-to-School Power Balls

Truthfully, these are anytime super food snacks, but I made them specifically to send Nolan off to summer camp at his new school, so alas, the title of this post.  If you’ve already tried making them, you know that my power balls are filling enough that two or three make for a solid snack, and sweet enough (but not too sweet) that they could practically pass for healthy truffles.  They are the ultimate school snack and one that I’m sure Nolan’s friends will have their eyes on.

There’s nothing unusual or new to report with this version, as these power balls include all ingredients you’ve seen in my previous posts.  The star today is sunflower butter—which made its first appearance in my dark chocolate sea salt power bars—since it is nut-allergy friendly.  Many schools have strict rules about peanuts on campus, making sunflower seeds an excellent alternative.

Using a melon baller, I made these power balls extra small so that they are bite-size for Nolan and easy to snack on between activities.  I’ll admit, whipping these up takes a lot more time than picking up a box of fruit snacks at the grocery store, but it’s well worth providing my kids the best nutrition possible to get through their busy days.

Looking for a different shape and slightly different formula?  Check out my power bars!

FORMULA BASE:  POWER BALLS

Makes 12-14 small balls (or 20-ish mini-balls)

For the dough:

  • 1 cup nut or seed butter (nuts/seeds only) –>  I’m using sunflower.
  • 1 cup uncooked whole grains –>  I’m using rolled oats.
  • ½ cup unsweetened dried fruit (without added oil) –>  I’m using 6 small pitted medjool dates.
  • 2 tbsps natural liquid sweetener –>  I’m using 1 tbsp agave syrup.*
  • 1 tbsp ground flaxseed
  • 1 tbsp unsweetened cocoa powder

Garnish ideas (approximately 4 tbsps):

  • Raw seeds -> I’m using 2 tbsps of ground flaxseed.
  • Raw finely chopped nuts
  • Unsweetened coconut flakes -> I’m using 2 tbsps of unsweetened, desiccated coconut.
  • Unsweetened cocoa powder
  • Finely chopped unsweetened dried fruit bits (without added oil)
  • Melted dark chocolate (which will re-solidify after dipping)

*I cut 1 tbsp of sweetener because the sun butter I happen to be using was pre-sweetened.  I never buy nut or seed butters that contain added salt, oil, or sugar, but the lady that used to watch my kids had an excess of sun butter that she was concerned would go to waste.  I’m not going to pass up free plant-based butters (which can be quite expensive), so I needed to adjust my formula today.  🙂

Turn your whole grains into flour using your food processor or blender. You could also use rolled oats as is. The texture of the balls will be different, but rolled oats are one of few grains soft enough to be palatable without becoming flour.

Combine the flour and your remaining ingredients in a food processor. Run until a thick, pliable dough forms. You will probably have to scrape down the sides of the processor with a spatula at least once.

Shape the dough into 1-1 ½ inch balls and roll in garnish.

garnish

Enjoy immediately or store in the fridge.

power balls