Meaty Black Bean Burgers with Simple Avocado Sauce

If you’re a former meat eater or simply trying to consume less meat, you may find that transitioning into a vegan or vegetarian can be difficult when you’re missing comforting flavors and textures. Over four years into following a plant-based lifestyle, I now very rarely miss meat, but there are moments that the thought of something I used to eat gets my mouth watering.

I never ate much red meat in the past, but like many Americans, I did enjoy the occasional juicy hamburger. In Michigan, where I grew up, other than out at restaurants, we didn’t really eat burgers unless the weather was warm enough to grill outside. Thus, hamburgers were generally a spring/summer treat and one that I looked forward to in attending backyard barbeques.

Today’s recipe is an adaptation of my veggie burger formula that is the closest I have come so far to the taste of an all-beef patty. The combination of black beans, kaniwa, and mushrooms not only creates a beef-like appearance (you could eliminate the corn for an even more authentic look), but their marriage of flavors turned out rich and meaty, too. I made one patty to cook on the stovetop in a hot pan with a drizzle of oil and turned the rest of the burger mixture into mini-patties that I baked. Both were dense, yet easily pliable. The char I achieved on the stovetop version yielded the more meat-like flavor, if that’s what you’re going for.

Travis whipped up a simple avocado dipping sauce—which could also serve as a condiment for large patties or even a salad dressing for a side dish you’re making—for the mini-patties that really completed the dish. We were certainly satiated and had leftovers, too. For the record, after making these burgers, I didn’t miss the beef variety for a second. 🙂 Enjoy!

FORMULA BASE:  VEGGIE BURGERS

Yields 6 patties (or a varying number of bites)

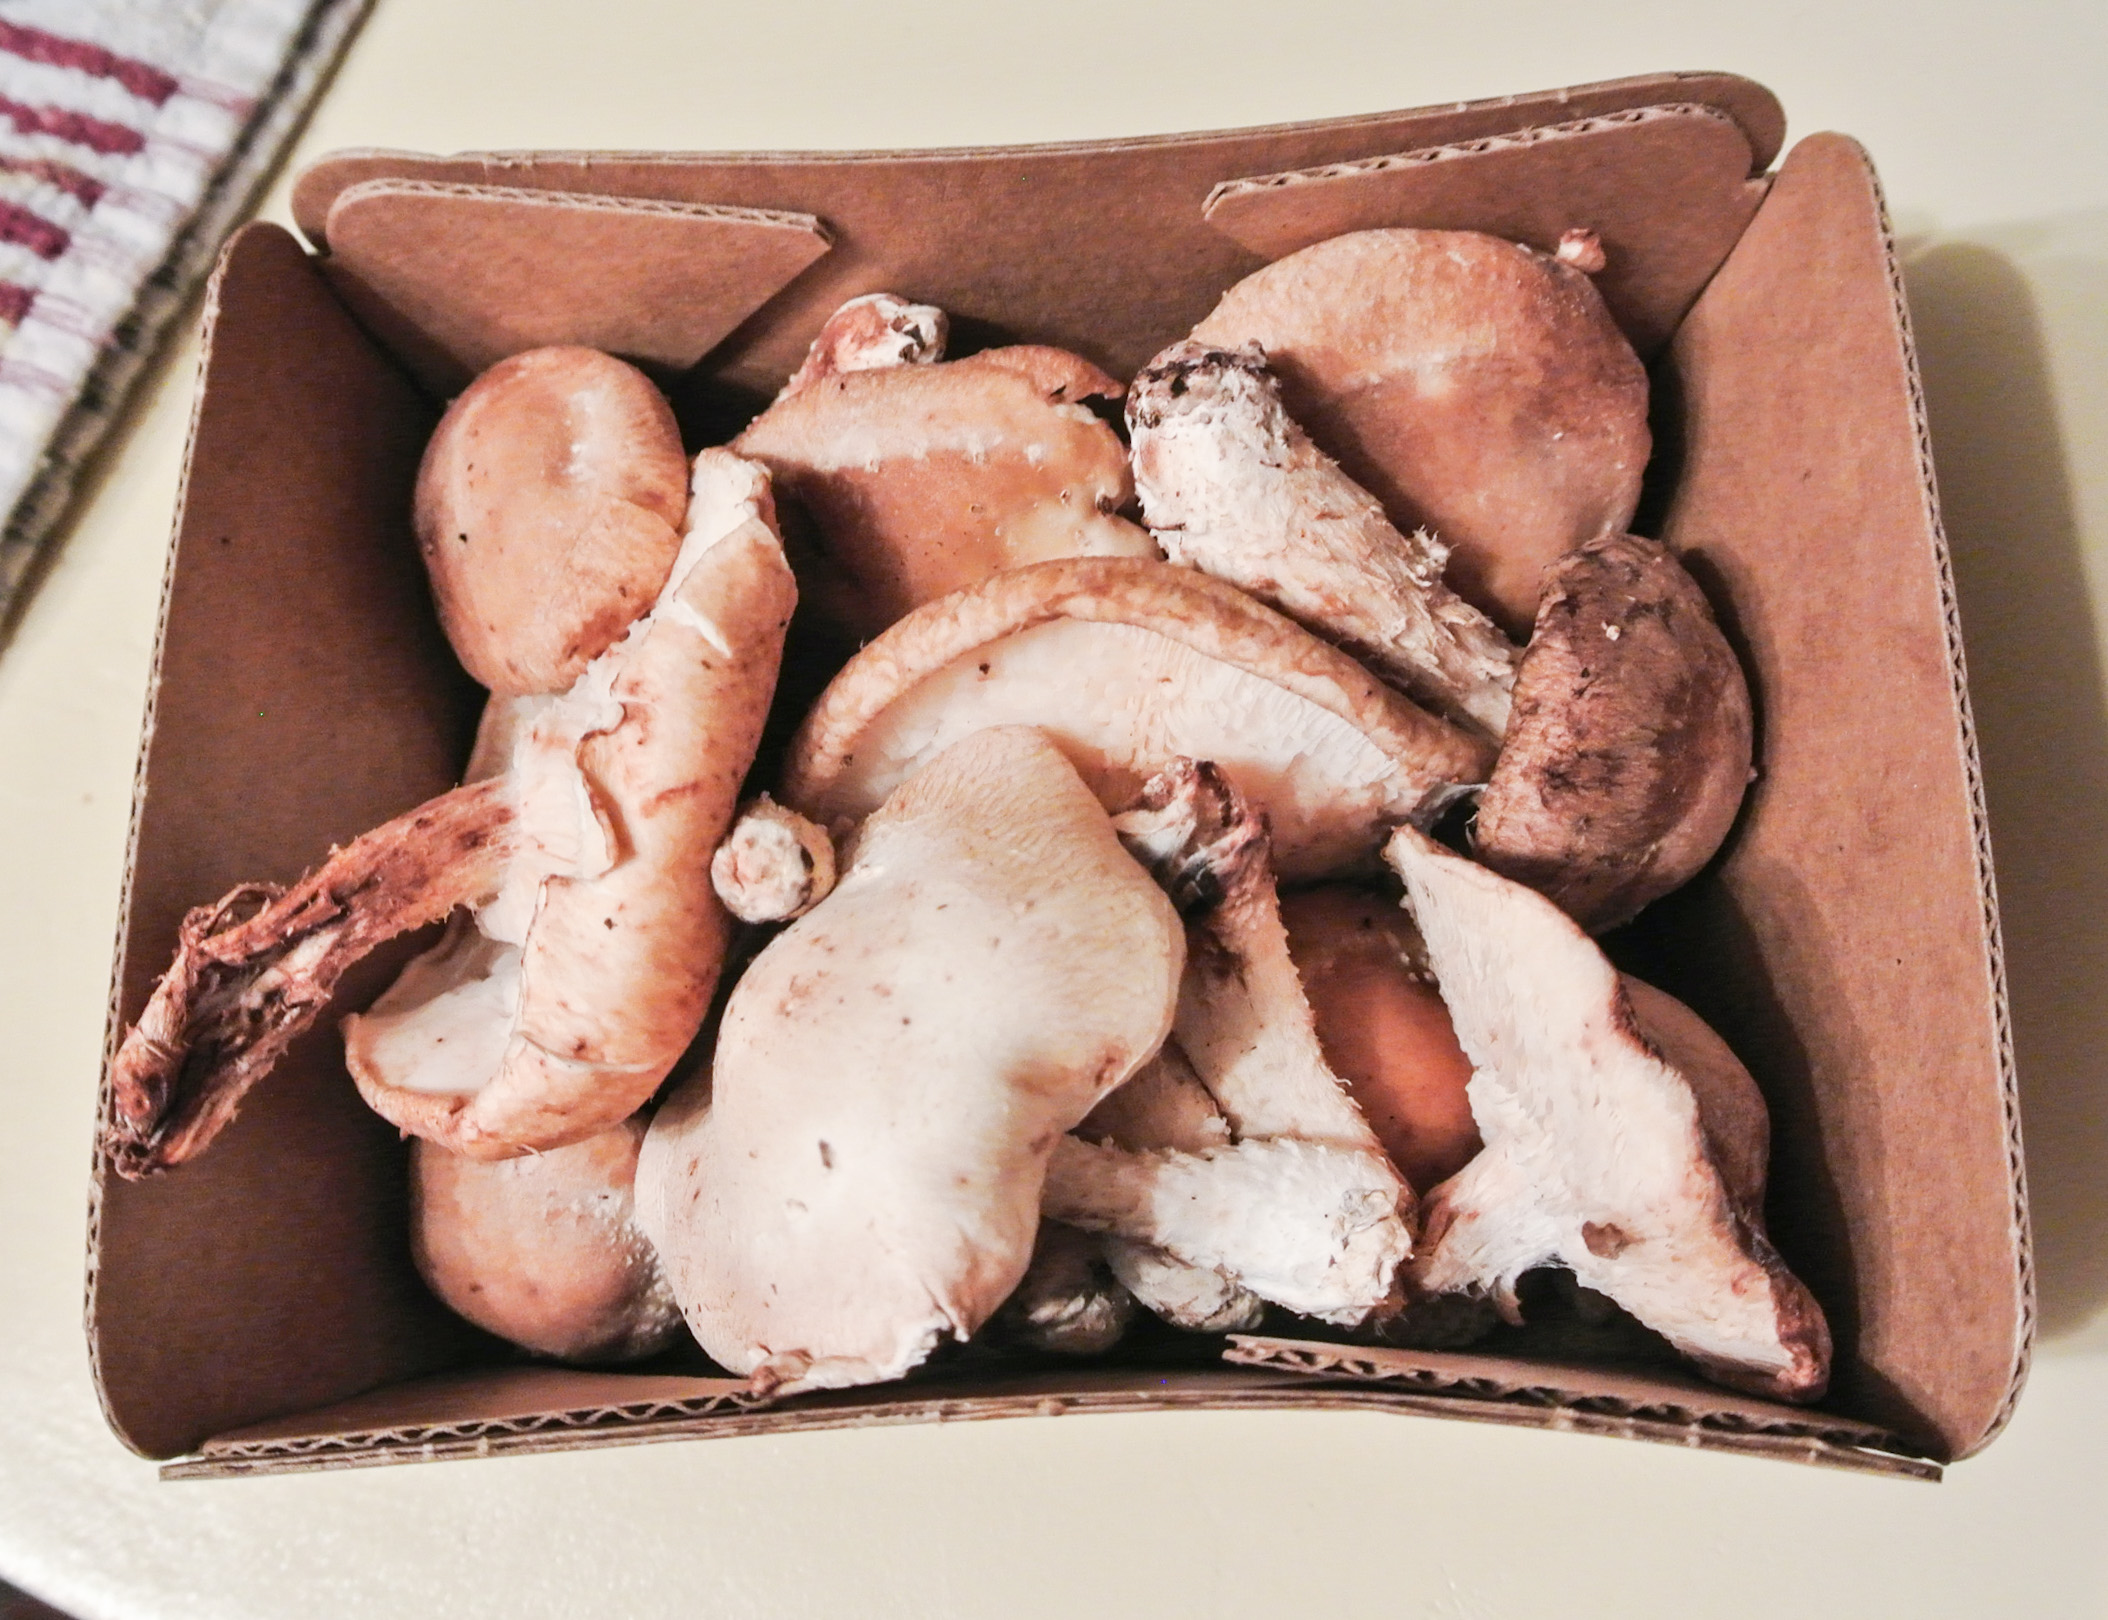
  • 2 cups finely chopped or shredded raw vegetables  –>  I’m using ¼ of a large white onion, ½ cup corn, and 1 cup button mushrooms.*
  • 1 cup cooked whole grains  –>  I’m using kaniwa, cooked in water.
  • 2 cups** cooked beans or lentils  –>  I’m using canned, sodium-free black beans.  (Remember, cooking dried beans is ALWAYS healthier, but for some reason, those do not agree with my system.)
  • ¼ cup+ liquid for pureeing beans/lentils (i.e. homemade veggie stock, citrus juice, water, unsweetened and unflavored plant milk, oil, etc.)  –>  I’m using grapefruit juice. (‘Tis the season in Arizona!)
  • 1 “egg” (1 tbsp chia or flax seeds + 3 tbsps hot water)  –>  I’m using flax.
  • 2-4 cloves raw garlic  –>  I’m using 2.
  • 2 tsps herbs and spices –>  I’m using 1 tsp nutritional yeast and 1 tsp chili powder.
  • Pink Himalayan sea salt and fresh ground pepper to taste  –>  I’m using ¼ tsp salt.

*Save your mushroom stems for a richer homemade veggie stock.

DSC_2799

**Today, I was a tad short on beans, so I added some breadcrumbs to ensure that the burgers would be hearty enough and hold together. The beauty of the Fresh Formula concept is that my formulas are super adaptable. 🙂

If you need to, cook your grains, beans, and/or lentils first.  Once they are finished, preheat your oven to 350 degrees.  Puree the cooked beans/lentils with the garlic until smooth.  Finely chop or shred your vegetables (peel first if necessary). I don’t typically precook the veggies, but I knew that the mushrooms would change in size and texture dramatically and didn’t think baking alone would achieve a meaty consistency. So, I sautéed them in a pan before combining with the other ingredients.

DSC_2800

Use a wooden spoon to combine all ingredients except the egg. Massage the egg in with your hands.  A thick dough will form.  It should be sticky enough that all ingredients remain together, but not so sticky that your hands are pulling it apart in trying to form shapes. Lightly grease a baking sheet or line with a silicone pad and assemble patties and/or bites.

DSC_2803

Cook times will vary depending on shape and thickness.  It took these 40 minutes to cook through without flipping (I have found that I don’t need to flip when I use a silicone baking pad).  Set a timer for twenty minutes to start, check back often, and flip as necessary until your burgers or bites are of a cooked and palatable consistency.

These burgers are so dense and filling that I eat them bun-less, but you can certainly serve them with your bread of choice. If you’re serving bites, consider this flavorful dipper:

  • 3 ripe avocados
  • 2 tbsps citrus juice -> I would typically use lime, but have tons of grapefruits on hand from our winter harvest.
  • Pinch of cayenne pepper
  • Pinch of pink Himalayan sea salt

Combine all ingredients in a blender or food processor and puree until smooth. (Would make for an awesome fresh veggie, dip, too!)

DSC_2805

Advertisement

Shitake Mushroom Risotto

A few months back, I introduced you to my risotto formula, starring Arborio rice and garnet yams.   I explained that I like to do risotto up with a vegetable that either needs to be cooked or is generally more palatable cooked, thus allowing me to consume the majority of my other vegetables raw.

Today’s risotto features shitake mushrooms. These fungi don’t need to be cooked and I actually really happen to enjoy them raw atop salads, but their richness (and meatiness) is certainly more prevalent in a cooked state. Thus, Travis and I typically make our risotto with some sort of potato, mushroom, or both (but of course, you could use any vegetable or none at all).

Shitake mushrooms have been shown to strengthen the immune system and lower blood cholesterol levels. They are also powerhouses of selenium, iron, fiber, protein, and vitamin C. They have been used in China for medicinal purposes for thousands of years, so I’m confident that eating a bunch of ‘em will only serve me well.

DSC_2389

Since I’ve already walked you through how to make risotto, I kept the pictures few and simple for this post. Make sure you check out my previous post if you’d like to see step-by-step visuals for making this decadent dish. Enjoy!

FORMULA BASE:  RISOTTO

Serves 4 (as a meal)

  • 8 cups homemade vegetable stock (or water)* –> I’m using veggie stock. This batch contained beet scraps, so it’s a little on the reddish side. 🙂
  • 2 cups Arborio rice**
  • 1 cup chopped vegetables (optional) –> I’m using shitake mushrooms.
  • ½ cup white wine –> I’m using moscato.
  • 1 small onion –> I’m using white.
  • Several cloves garlic (go with what you like) –> I’m using 3.
  • 2 tbsps oil –> I’m using extra virgin olive.
  • Fresh herbs, spices, salt, and pepper to taste –> I’m using 1 tsp dried thyme, a few turns of fresh ground black pepper, and a ½ tsp pink Himalayan sea salt.

*You may not use it all, but it’ll be close. Have it handy on your stovetop in a pot on low heat, ladle-ready.

**Unlike other grains, do not rinse your Arborio rice before use.

Start by chopping your onion and garlic and sauté in a touch of oil over medium-high heat until they are almost cooked through, but not quite. Then, transfer them to a bowl, return the pan to the stovetop, add a touch more oil, and sauté your vegetables, if using, until almost cooked. Transfer them to a separate bowl and return the pan to the stovetop, this time over medium heat.

Add more oil (about 1 tbsp) to the pan to toast your dry rice. Stir the rice constantly to prevent sticking, toasting it until it has deepened in color slightly, about 5 minutes. Add in half of the cooked onions and garlic, as well as your seasoning of choice, and deglaze your pan with the white wine. After the wine cooks down, add a ladle of your veggie stock and stir fairly regularly over the course of the time it takes for that ladle to absorb completely. You can expect 3-5 minutes between ladles.

You will repeat this process—ladle and stir—many times over the course of 40-45 minutes. When the rice is almost finished, add in the remaining onion and garlic, as well as your veggies (if any), to the pan to finish cooking. From start to finish, this dish will take you 60-75 minutes (depending on how fast you prep and such) and a lot of attention. As soon as the rice is tender, you’re done, so taste as you go.

Garnish with fresh herbs or thinly-sliced green onion. Makes for yummy, comforting leftovers for 3-5 days.

DSC_2391

Savory Mushroom Gravy, Courtesy of Travis!

For today’s post, my amazing hubby Travis is making a guest appearance. Nearly thirty weeks pregnant, these days, he’s doing more work in the kitchen than I am. Thankfully, he loves to cook and doesn’t view it as a chore. In fact, in the two years that he was working on his MBA, he really missed honing his culinary skills.

…not that they need much improvement! Travis is an excellent amateur chef and has even competed in the past. Like me, he will peruse a few ideas online for inspiration in creating something new and then just go for it. Every time someone tastes one of his dishes and asks for the recipe, he is at a loss because he never measures or writes anything down. His genius comes to fruition through randomly throwing items together.

For today’s savory mushroom gravy, I asked Travis to develop a versatile formula and this time, to record it. 🙂 He did not disappoint and highly recommends listening to Norah Jones during preparation.

Before we get to cooking, a quick note about one of the star ingredients: button mushrooms. The most commonly consumed mushroom, available year-round, is the white button. Although not as aesthetically appealing as fancier, more exotic varieties, these fungi get the job done. Like many (if not all) mushrooms, buttons develop a meaty texture when cooked and are rich in copper and essential vitamins. Several studies have even show buttons to prevent heart disease, boost the immune system, and treat and prevent some types of cancer. Win!

DSC_2369

Portobello mushrooms are also featured in today’s adaption of Travis’s gravy formula. You can read more about this in my lettuce wraps post, another delicious way to consume fungus.

One more thing…if you like a chunky gravy, finely chop your ingredients. If you plan to puree the ingredients for a smooth, creamy gravy (which is what we’re doing today), a coarser chop is sufficient so long as the pieces are approximately the same in size for even cooking. Enjoy!

FORMULA BASE: MUSHROOM GRAVY

Yields approximately 2 cups

  • 2 cups chopped mushrooms* –> Trav’s using 1 cup each white button mushrooms and portobellos.
  • 1 cup+ cooking liquid (homemade veggie stock, red wine, water, unsweetened plant milk, etc.) –> Trav’s using stock.**
  • ¾ of an onion, chopped –> Trav’s using white.
  • 2 large cloves of garlic, minced
  • 2 tbsps flour –> Trav’s using whole wheat.
  • 1 tbsp oil –> Trav’s using extra virgin olive.
  • 1 bay leaf
  • ½ tsp minced fresh herbs (or ¼ tsp dried) –> Trav’s using ¼ tsp dried thyme.
  • Salt and pepper to taste –> Trav’s using a pinch of pink Himalayan sea salt and several turns of freshly grated black pepper.

*If you’re using any large caps with lots of gills, remove the gills before chopping and cooking.

DSC_2372

**Remember, we make veggie stock from veggie scraps. This version is reddish because of a beet scrap in the mix. Just FYI. 🙂

Pour your oil in a sauté pan over medium heat. Chop your vegetables. Start by adding the onions only. After approximately 2 minutes, add the garlic. 2 minutes later, add the mushrooms, herbs, and bay leaf and cook for another 6-8. Add the flour and stir until thoroughly moistened.

DSC_2380

Add cooking liquid, a ½ cup at a time and reduce until desired consistency is achieved.

DSC_2381

Add salt and pepper to taste and remove the bay leaf. Pour the entire mixture into a blender and puree until smooth (optional).

DSC_2382

Serve atop classic mashed potatoes, in a vegan shepherd’s pie, or in another favorite preparation. We are serving ours over rosemary mashed sweet potatoes and parsnips: the perfect balance between sweet and savory!

DSC_2387

Travis reported that this gravy tasted best the first day, but can certainly keep for several in the fridge.