Dessert for Breakfast? Yes, Please!

DSC_1509

Today, I made my favorite dessert smoothie for breakfast. Above, you can see the finished product, ready for consumption by one busy mommy and on-the-go toddler.  While you’ll love this sweet treat in a traditional post-meal capacity, it can serve as a decadent start to your day, too. Jam-packed with protein and calcium, it puts many other breakfast options to shame.

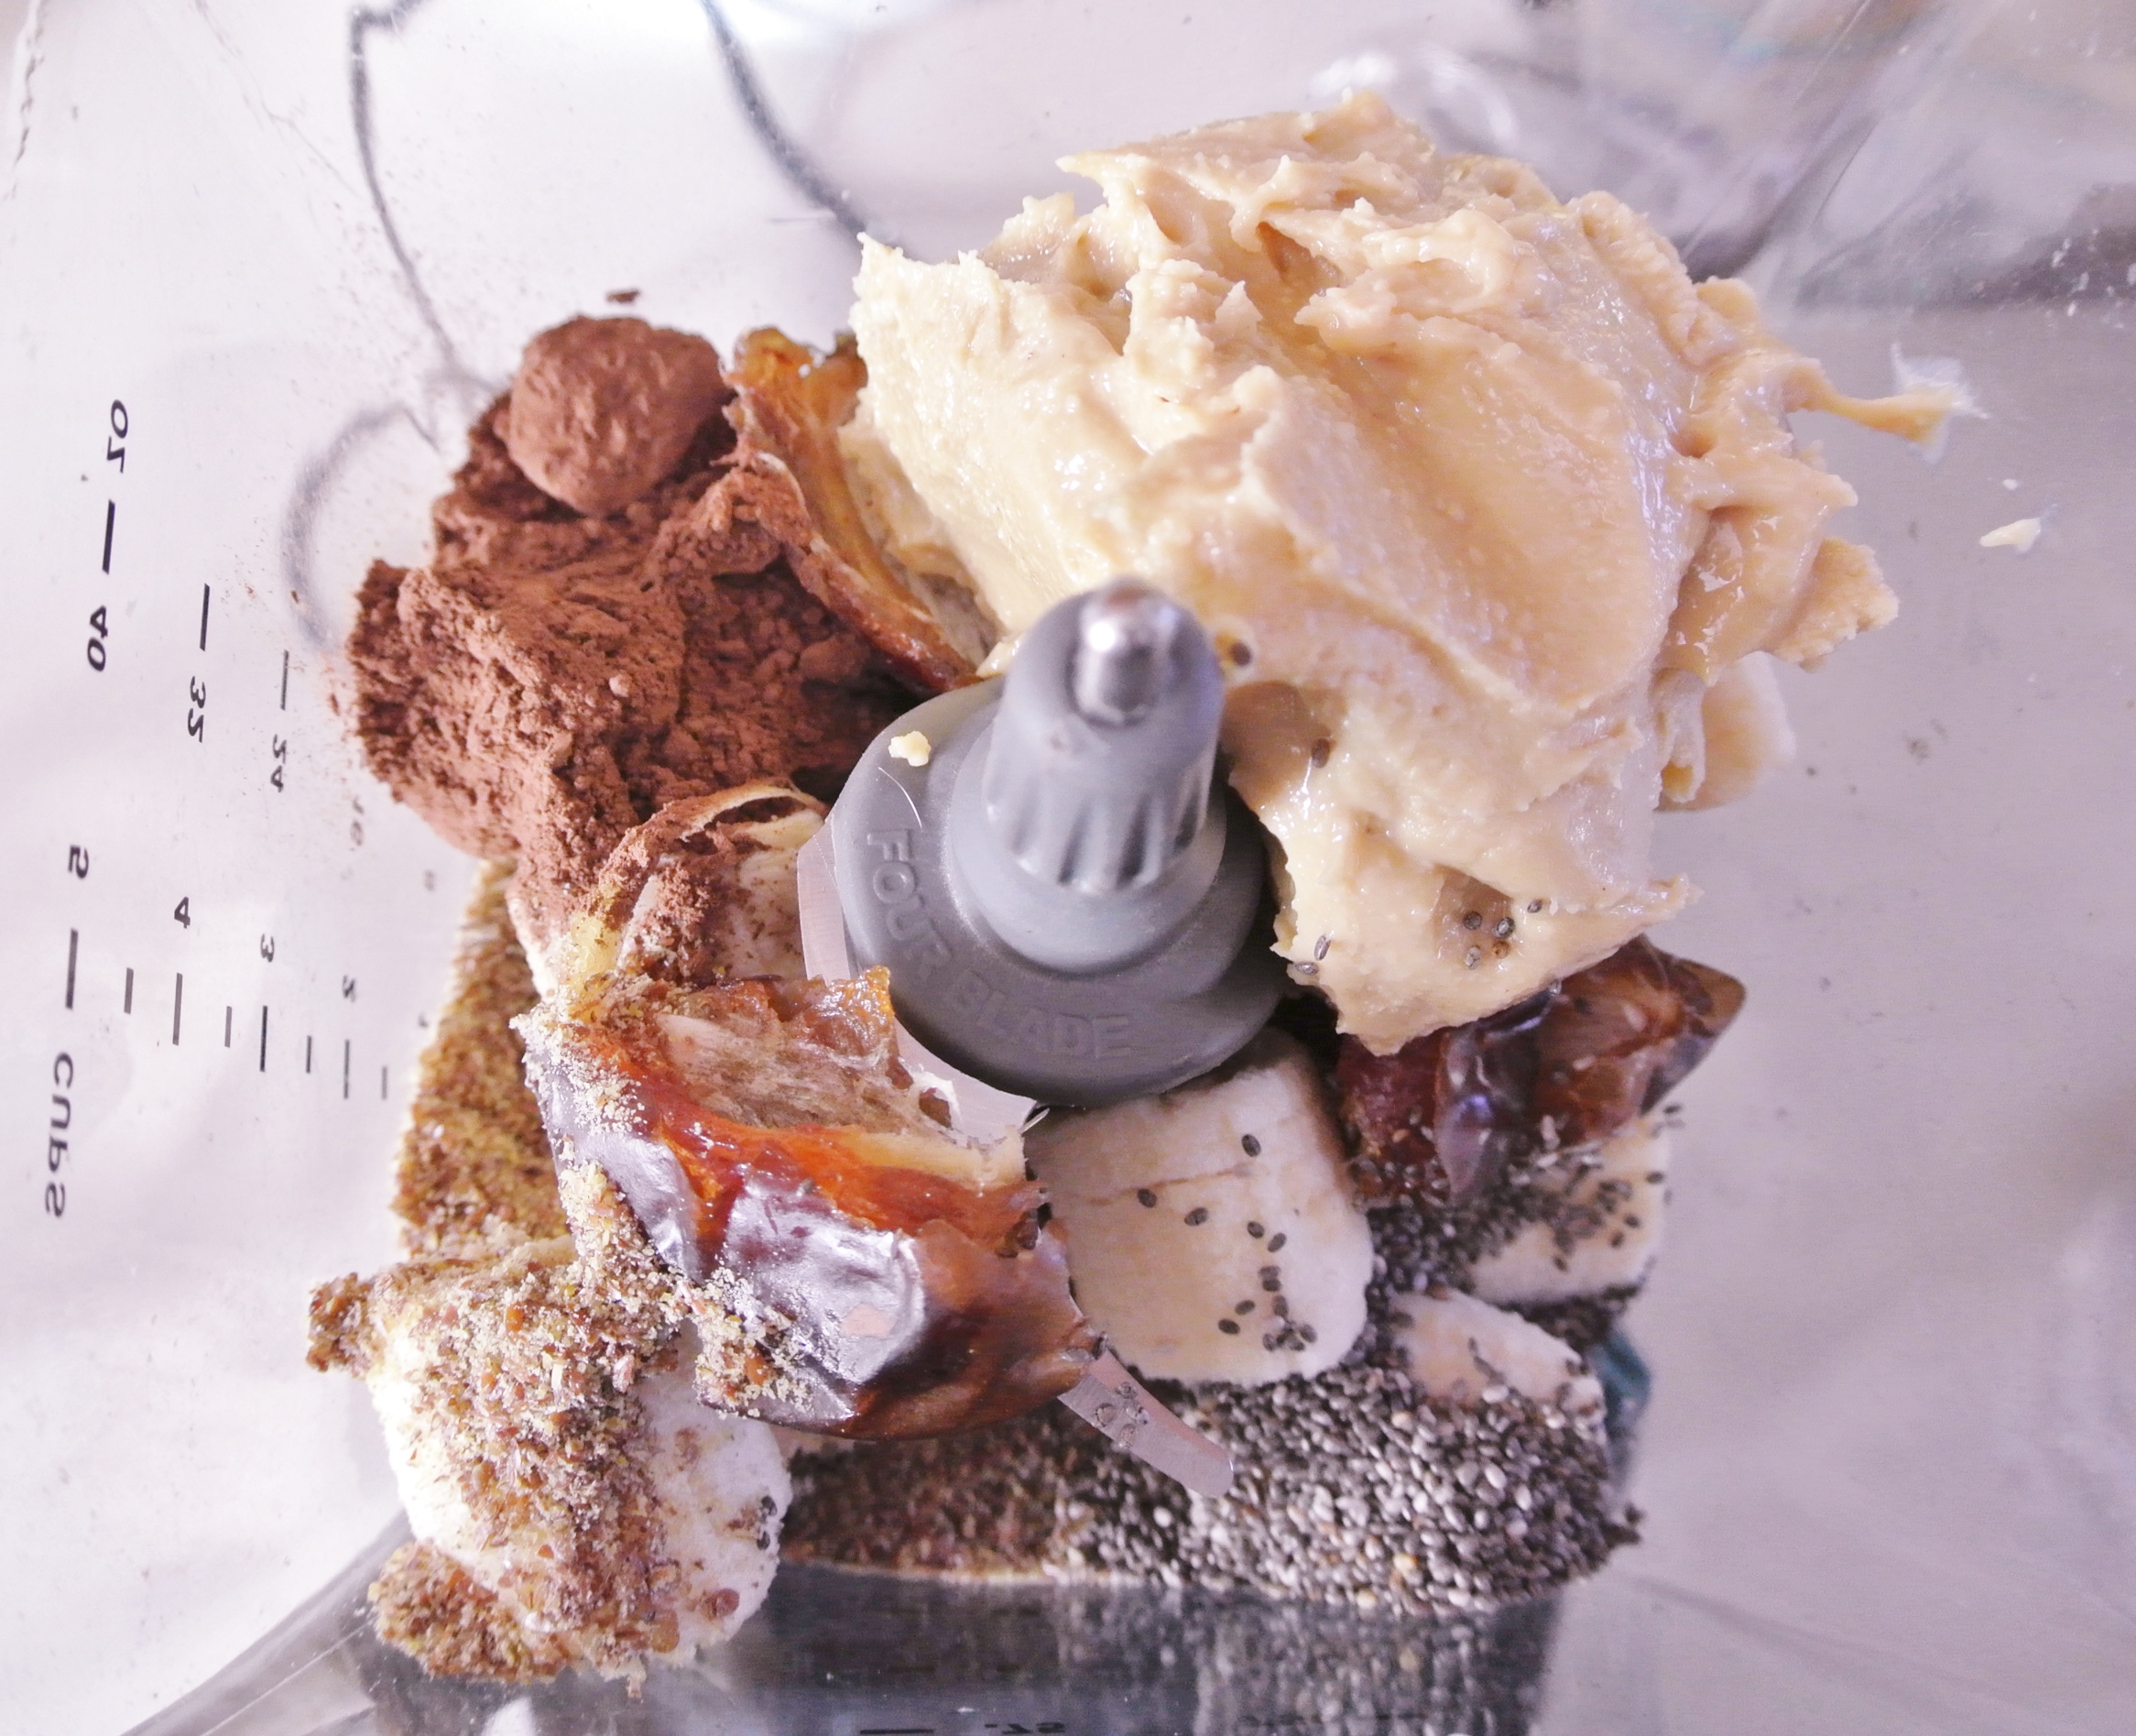
A few words about some of the ingredients (pictured below) in this chocolate peanut butter banana concoction…

DSC_1504

First, we have cocoa power. To keep the sugar content low, it is imperative that it be unsweetened. Cocoa powder, which contains powerful antioxidants, has numerous health benefits, so it may be tempting to add a lot, but its flavor is quite intense. Start with a tablespoon and slowly add more if you want your smoothie extra chocolaty.

Secondly, seek out a peanuts-only peanut butter. Many peanut butters contain added sugar, oil, and salt, which may result in you initially finding a simpler peanut butter bland. The purer taste, however, will grow on you over time; I now find myself off-put by peanut butter with unnecessary additives.

Lastly, because the cocoa power, peanut butter, and almond milk in this recipe are all unsweetened, you have only the bananas to rely on to give this smoothie a dessert-like quality. Riper bananas will be sweeter, but if even that is not enough for you, add medjool dates–which are rich in fiber and vitamins–for a little something extra. As you can see in the photo, they do contain pits, which can be easily removed by splitting the dates in half with your thumbs. Medjool dates are very soft, easy to work with, and blend well, if you have a high quality blender.

That leads me to my blender: the Ninja, which includes pitchers in two different sizes. The most basic model will run you about $100, where the more advanced models with more equipment will be over $300. While I would love someday to own one of the hailed Vitamix or Blendtec processors, for a little less coin, I’m happy with the Ninja for now. If you do not own a blender with advanced capabilities and fear that the less-than-perfect puree of the dates would result in an unappealing texture, you could substitute another sweetener of your choice.

DSC_1501

Overall, this smoothie blends up nicely, with the exception of the chia seeds, which I’m not sure would completely puree in any blender. Their texture reminds me of the tiny seeds on strawberries or in kiwis and does not bother me, but you can eliminate them if you so choose. I have chia seeds in many of my formulas/recipes, as they are a super food loaded with omega-3 fatty acids, calcium, fiber, and protein.

But the seeds and peanut butter are fattening, right? Yes, they are. I’m happy to report, however, that seeds and nuts contain cholesterol-free fats. If you’re following a fairly strict plant-based diet, seeds and nuts are among the only sources of fat that you will ingest. Think about that squishy, white-ish edge of a pork chop or the grease that floats on top of a cheesy pizza and you will celebrate the addition, in moderation, of a different kind of fat to your diet. Also, this smoothie need not be your everyday breakfast (I make it once or twice a week) – check out my fruit and veggie smoothie formula, too.

With that said, on to dessert!

FORMULA BASE:  DESSERT SMOOTHIE

  • 2 frozen bananas (or fresh bananas and ice)
  • ½-1 cup specialty ingredients –>  I’m using ½ cup peanut butter and 1 heaping tbsp of unsweetened cocoa powder.
  • 1 tbsp chia seeds
  • 1 tbsp ground flax seeds
  • ¼-½ tsp extract of choice (optional, and amount depends on flavor intensity) –>  I’m using no extract in this recipe.
  • Pitted medjool dates as needed for sweetness  –>  I’m using 2.
  • Juice or plant milk until desired consistency (start with 4 oz)  –>  I’m using unsweetened almond milk.

DSC_1505

Combine all ingredients in a blender. Taste and adjust specialty ingredients as necessary.  Enjoy!

What’s in YOUR Kitchen?

DSC_1420

Welcome back! As plant-based living may be new for you – or perhaps you just need new ideas – I thought it would be helpful to give you a tour of my kitchen so that you can see the types of produce I buy and some of the nonperishables that I regularly keep on hand.

The photo that you see at the top of this post is a shot of my countertop, which is often overflowing with produce that does not require refrigeration. I maintain a plentiful stock of bananas, as I use them in many of my recipes and they are among my son, Nolan’s, favorite fruits for snacking. This time of year, I also have an array of citrus, much of which I obtain from neighbors for free. Citrus fruits are ripe for the picking during Arizona’s winter.

You’ll also see in this photo that I have fresh vanilla beans on hand to use in various recipes and to make homemade extract. The basic formula for an extract is the flavor agent plus vodka and involves a long soaking period (another post, another day). Moral of the story? If you have the opportunity to make your own extracts, you’ll find that they are purer and higher in quality than many of the store-bought, imitation varieties. I digress…

Next, we move into my fridge, where you can spy everything from a batch of homemade veggie stock (located under Basic Formulas), to black-eyed peas that have been soaked and are ready for further cooking, a bowl of triple berry togurt (located under Breakfast Formulas), and of course, more produce. We always have a ton of it and get the biggest bang for our buck with a local food co-op called Bountiful Baskets. Through this organization, weekly, we have the opportunity to pay a flat rate of $25 to obtain approximately $50 worth of organic produce. The offerings are seasonal and often local and the contents of the basket are always a surprise. Check out the bountifulbaskets.org or conduct a web search to see if your state offers a similar program.

DSC_1421

On to my spice cabinet, which is my husband, Travis’s, pride and joy in our kitchen! Although the spices and herbs sometimes get misplaced during quick cooking, my hubby generally has them organized by ethnic application (e.g. Italian, Mexican, etc.) or other similarities. For example, mace is located on the exterior of the nutmeg shell; although different spices, they are part of the same fruit and often used together in cooking/baking, so they are grouped together. Yea, I know – our cabinet organization is a bit over-the-top, but with over 60 spices and herbs to choose from, it does well to have them arranged in a way that allows for easy selection.

DSC_1422

When we travel we stock up on herbs and spices that are native to the area and end up saving a ton, as those in jars in the supermarket can be pricey. We are still using, for instance, cinnamon sticks that we purchased during our honeymoon on the British Virgin Island, Tortola, in July of 2011, and turmeric that we bought the following summer when touring a spice farm in Zanzibar, an island off of the coast of Tanzania in East Africa.

Finally, here’s a look into my pantry. First, you can see a variety of oils, vinegars, and sweeteners. It is amazing what these products can do in the way of flavor, even in very small amounts. On the two shelves below those you’ll find staples like beans (dried and canned, no sodium added), seeds, and grains. While I always have quinoa and oats, for example, regardless of price, more expensive items like nuts, dried fruits, and dark chocolate I purchase and stock up on when they are on sale. The flexibility of my formulas and my willingness to experiment with new combinations allow me to create a delicious bite out of whatever I obtain. The very top shelf (not pictured) includes standard baking supplies like cornstarch and baking powder.

DSC_1424

If your kitchen needs a plant-based makeover, consider starting with one or two target areas and make changes slowly, especially if you’re trying to get a meat-and-potatoes spouse or some picky little ones on board. When Travis and I decided to start eating more healthily, the first item we did away with was cow’s milk, which we replaced with almond. Travis, who was a diehard whole milk drinker for years, now swears by almond and I, being lactose intolerant, couldn’t have found a better milk match. Nolan is even more adventurous, drinking coconut and oat milks on a regular basis. If those do not appeal to you, you could try soy, flax, rice, grain, cashew, sunflower, etc. There are lots of options that don’t include added sugar, hormones, or cholesterol and are often higher in calcium than the dairy variety. Plus, you can easily make your own plant milk (we’ll cover that another day, too)!

I hope that a private tour of my humble cooking headquarters has given you some ideas and inspiration so that you are prepared to tackle my formulas (and plant-based living in general) head on. Happy shopping and stocking!

Welcome to The Fresh Formula!

DSC_1414

Happy New Year and welcome to The Fresh Formula! Since I committed to a plant-based diet around this time three years ago, I thought it only fitting that I launch my blog on New Year’s Day. Many of us find ourselves making resolutions to improve our lives, and those often include health and wellness goals. I never resolve to follow a weight-loss diet, regularly utilize an exclusive exercise program, or lose a certain number of pounds because I find that such goals often lead to temporary results where you are constantly playing catch-up with yourself.

Instead, consider making a resolution this year that prompts you to change your lifestyle, and the rest – healthy eating, exercise, even weight loss – will fall into place. I remember years ago when the queen of talk, Oprah Winfrey, hosted the author of French Women Don’t Get Fat, Mireille Guiliano. Guiliano made a point that the French don’t have to spend hours and hours sweating at the gym because they incorporate exercise into daily life: taking the stairs instead of the elevator, walking to the store instead of driving, etc. I view plant-based eating similarly; it is a way of living…not a diet, a system for counting calories, or a strict exercise regime.

In the beginning, plant-based living may be a challenge for you, but I can tell you from experience that it piques curiosity, sparks creativity, and of course, becomes easier and easier. Over the years, I have found myself genuinely interested in researching and experimenting with food, flavor, and nutrition, and have been proud of the results.

So, what can you expect from this blog? Under About, you can read more about me, plant-based living, and my fresh formulas, and see new formulas and recipes popping up at least once a week under Recipes. Under The Formulas, I have amassed a small collection of formulas that are already tried and true in my kitchen. Each week, I will feature an existing or new formula and an accompanying sample recipe so that you can see what that particular formula looks like in action.

This week, I’ve decided to start with the formula that inspired this blog: Super Food Muffins (located under Breakfast Formulas). Today’s post will feature this formula in a blueberry lemon variety, but as you will learn, the formula is just a baseline for whatever ingredients YOU have on hand.  Here we go…


FORMULA BASE:  SUPER FOOD MUFFINS

Makes 12 regular sized muffins

  • 1 ½ cups flour –> I’m using whole wheat.
  • 1 cup cooked quinoa –> I’m using white (despite being rather blasé in appearance, it is higher in nutritional content than rainbow).
  • ¼ cup uncooked rolled oats –> I’m using an extra ¼ cup of quinoa instead, this particular go-around.
  • 2 tsp baking powder
  • 1 tsp baking soda
  • ¼ cup sweetener –> I’m using agave syrup.
  • 1/8 cup oil –> I’m using coconut, melted.
  • 1 cup raw (fresh or frozen) fruit or veggie –> I’m using blueberries.
  • 1-1 ¼ cups plant milk –> I’m using almond.
  • 1 tbsp ground flax seeds
  • 1 tbsp chia seeds
  • ½-1 tsp extract –> I’m using ½ tsp of pure almond.
  • ½-1 tsp spices –> I’m using 1 tsp cinnamon.
  • ½ tsp salt (optional) à I’m opting out of salt, but adding it will definitely make your flavors pop even more. I highly recommend pink Himalayan sea salt.
  • SPECIAL ADDITION: The zest and juice of one lemon.

Looking for a bit more texture?  Consider adding chopped raw nuts or seeds.

Preheat your oven to 350 degrees. Separately combine all of the dry ingredients and all of the wet ingredients. Pour the wet into the dry and mix with a wooden spoon. The batter will be thick and lumpy, but you can always add more plant milk if it seems too dry or dough-like.

DSC_1402

Spoon the batter into a lined cupcake pan and bake for 25-27 minutes.

DSC_1405

Use the toothpick test! Store in the fridge for up to two weeks.